Tuesday, July 1, 2014

Evaluation of FMP

Evaluation

My research was very helpful and there were some links between the photographers and the images that I researched. I think I've reached my aim of photographing the two's friendship and the relationship they have with each other. I talked about the good and bad things when I reviewed my best series of images. However I can say it again that the photos look so genuine, the kit was perfect for this type of photography. The images really show their life from their perspective. I usually shot wide open which allowed me to create some more artistic images by involving the environment and also allowed me to put much more emphasis on the subjects. I had another good experience working with natural light and I was able to apply the knowledge I gained from my research as well, such as get on eye level, how to get shallow DOF, what is the best exposure mode and shutter speed when photographing pets etc. I really feel that I can control the natural light as much as I can and it possible and finding a solution for how to get the best exposure. 
I feel that I have achieved all that I had proposed to do and reached the client expectations. Capturing memorable moments and their lifestyle and present high quality images at the end. However I feel that the shots are fine the project was successful, comparing my images to some of the professional photographers work, there is still a LOT to learn and improve my knowledge and understanding about everything, to not just mention pet photography. Overall, if i was to do this project again i would still go with the same subject as I love working with dogs, it's so much fun to be around them and have a relationship with them in some way. 

Final Images


THE END 

Review my best selection of images

Including both outdoor and indoor shooting I took about 300 hundred images as my camera was set to continuous shooting to don't miss any of the good moments. It was kind of a lengthy process till I selected the best ones. But I kind of selected the ones with same or similar compositions and arrange them in different folders, so I only had to concentrate on one type of composition and select the best ones out of them. 
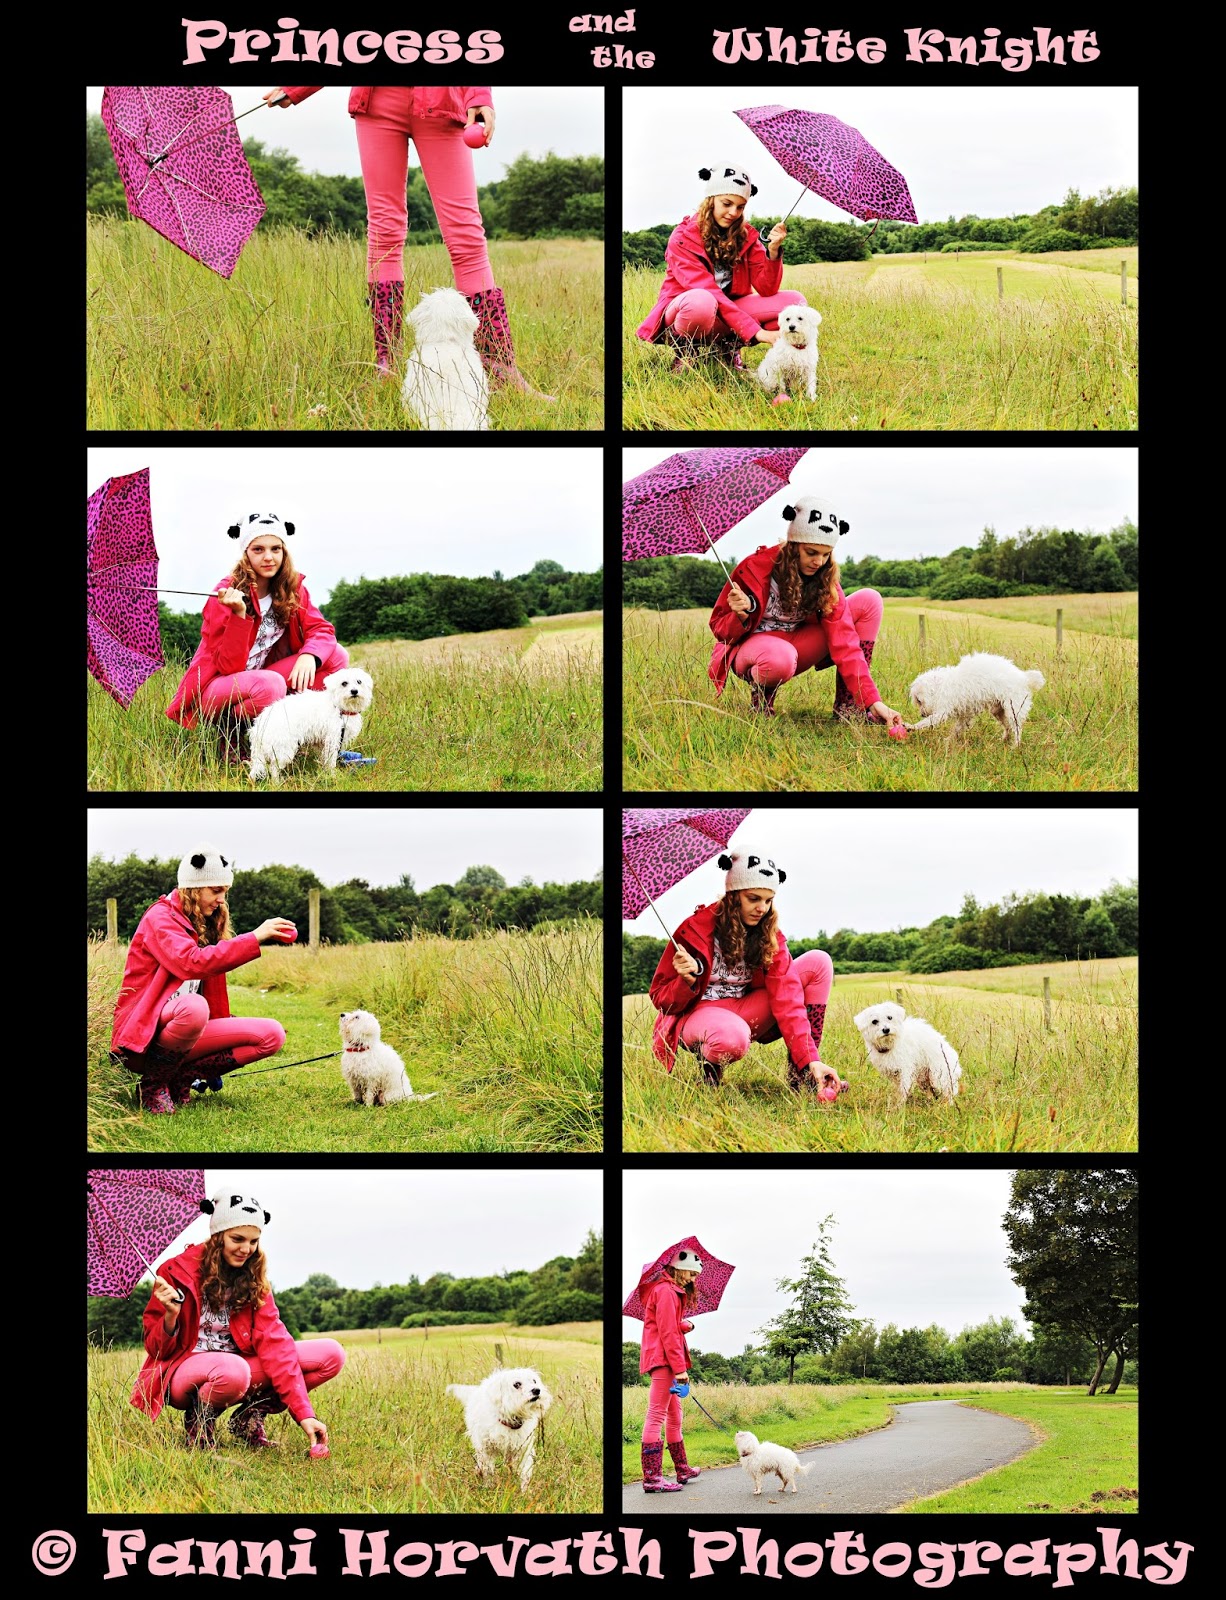
Outdoor

The main things that I like about these images is the matching colour of the clothes and the pattern of the boot and the umbrella, they just add interest to my images and also they really stand out, this pink is a very happy colour and the white dog also pops out from the background. The images are so peaceful due to the natural background. I love all of them, the different framings, the eye contacts or the way the dog interacts with his owner. Very genuine images and heartwarming as you can really feel the love between the two. The sky was overcasted as I waited which perfectly diffused the light.


Editorial work in Photoscape...

I didn't really have to much editing on these images, because my exposures were right but even the well exposed images are looking a little bit unflattery so I wanted to make sure the colours are deep and the image is bright enough, the contrast is better to get a more upbeat sharper outcome. And for this reason I just increased the strength of these factors.
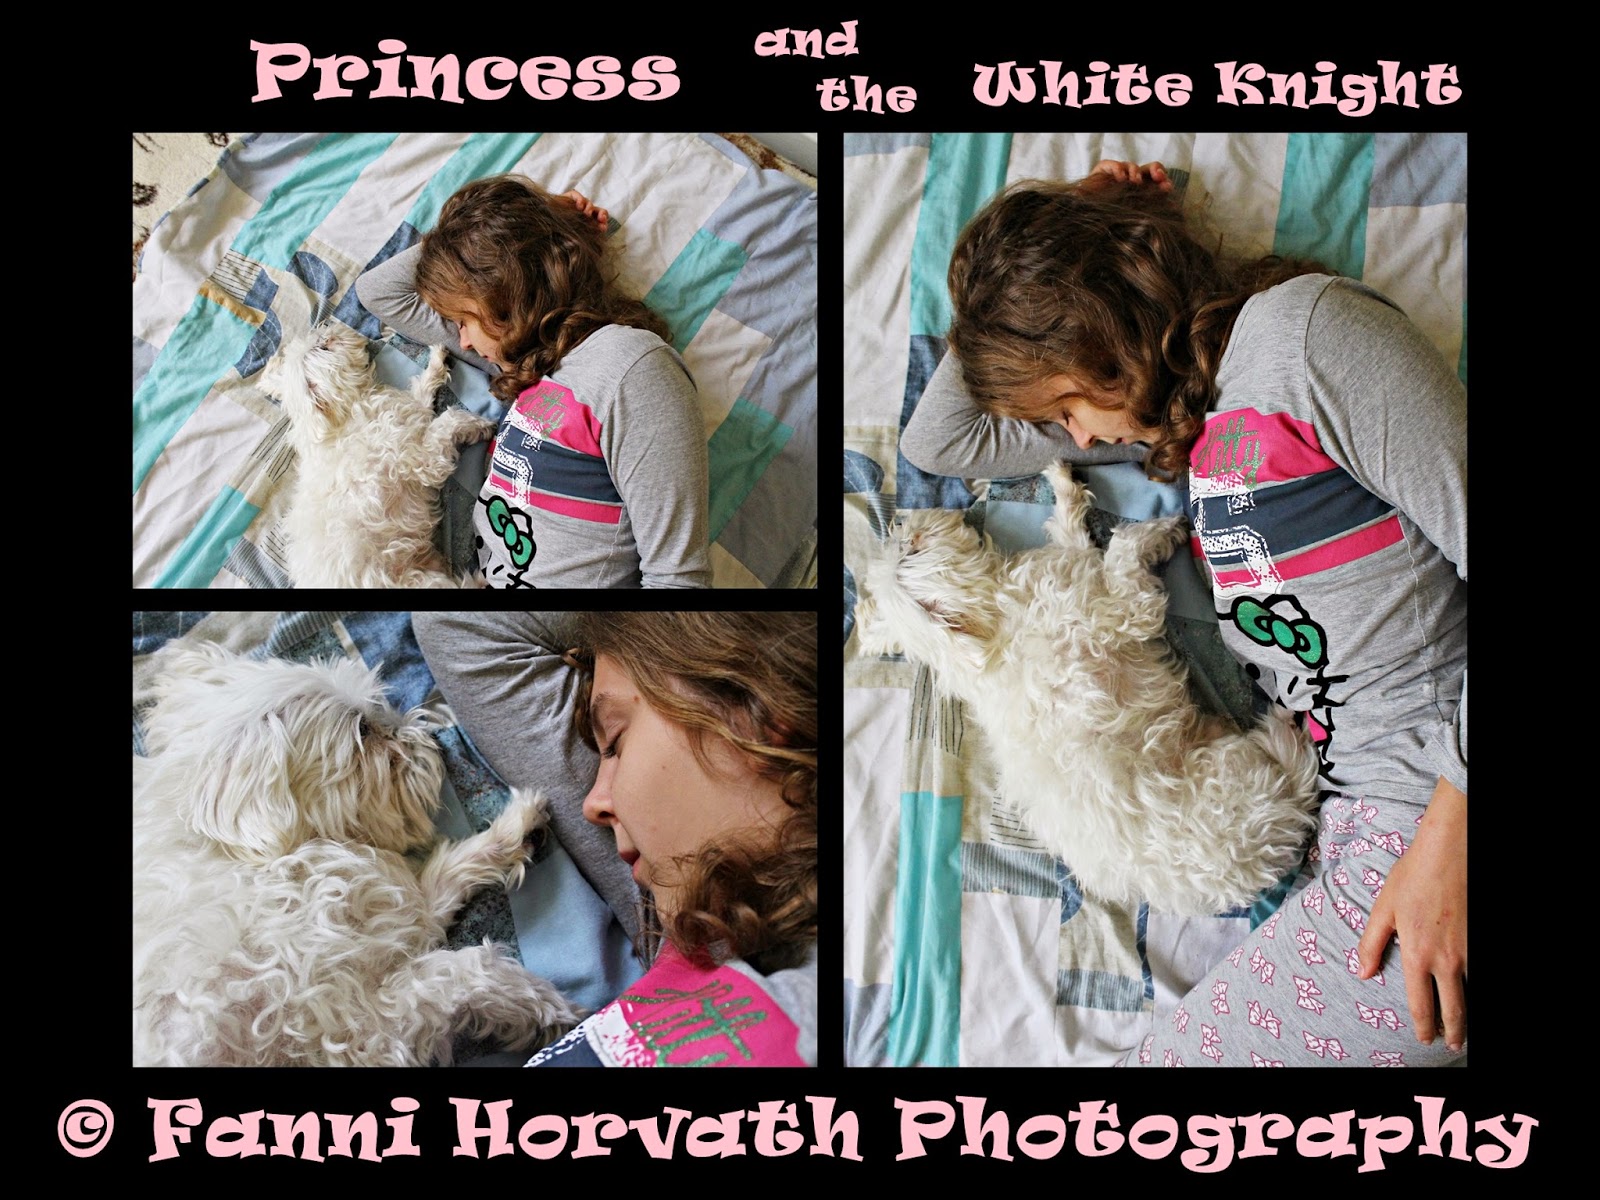


Indoor

1. For this images I chose a different camera angle that clearly shows their position and the way they sleep next to each other. The mattress was on the floor so it was easy for me to bend over and take the image from straight above. The 55mm focal length also allowed me to zoom in and get a closer image of their faces without distracting them.


2. Now here I had a little problem with the exposure, as the decent light wasn't really enough to get well exposed images with a quick shutter speed that I've worked with, so I had two choices, either working with a really high ISO setting or use a flash. So first I tried to use a flash, but I didn't like the strong shadows that it created but obviously the images were lit better, I rather chose to work with a high ISO that as we can see make the images very noise (mainly the first one). To try and get better quality of images I asked my client to change position and I kind of moved to the side so more light hit the camera sensors and I got brighter images as a result. I also like the texture of the carpet and the pattern on the wallpaper. And the two are just so cute together.


3. What I really love about these images is the spot light that I was able to create with a use of a small led light. As the room wasn't well lit this little artificial light helped to light up my subjects and just the right places of the photos.


4. These are probably the most funniest images out of all. Having an ice cream, something that tastes so nice really caught the dog attention and wanted to have some and I was able to capture the small lasting expressions or his tongue that was out in a split second with a quick shutter speed and with the continuous shooting feature of the camera. My compositions are varied, the light was coming from the right angle and the room's furniture was perfect to help me create the contrast between the dog's coat and the background.


Presentation

There are several different presentation ideas that I have considered for my final series of images, but because my project was client led I thought creating collage out of the best selection of images would be a good way to show my work. It will just take a little bit of extra editing to it and the process isn't that hard with the software I'm going to use for it.

Editorial work in Photoscape...

Collage

So to make a collage out of my best images first i opened the photo editor software Photoscape and out of the icons on the home page I selected combine. Now after I added my choice of images I could change the way of placing them either down, side or checker. When I worked with even number of images like 8, 6 or 4 I chose the checker option and set the columns number to my choice. Which was two in this case, to get a square form.


After I resized the ratio and the preview zoom to fit it onto my screen I started to add and increase the margins both between and the outside of the images. I chose a 3x bigger outer Margin because I know I wanted to give a headline to my image and my 'business' name.


Then I clicked on Edit which opened the finished collage in a new window that will give me more options to edit the image. I realized the outer margin won't be enough for my lettering, so I increased the margins on each side once again.


Finally, when I had enough space to type on I use the text tool to add my text to the image. I chose a nice pink colour because that's a girly colour and I used an interesting letter type that I liked. I applied a different outline colour for the text and at the end I just added the piece of words and resized them, arranged them to their places.

Shooting plan (sketches)

Outdoor

Before the shooting took place at the park I went out to discover and consider the potential spots of taking the images. I chose a particular area of the park by how many options it can offer me to shoot from and I chose this area because it was diverse and offered me the possibility to compose my images differently.

Here is the sketch about my shooting plan:


Indoor

With indoor shooting is more important to be aware of the direction of the light and have well lit rooms to get well exposed images at the end. However sometimes we need to use fill light/flash light to light up the subject if the available light isn't enough, or just turn on some of the ambient light(s) see if that's helping.

Here is my sketch about the rooms I intend to shoot in:


Weather forecast on the day of shooting

Friday, 27th June

Overcast with a stray shower

15 Celsius Lo 11 Celsius

Health and safety 

The health and safety considerations for my shoot were things like being aware constantly of my surroundings. Try to avoid mud because that is quite slippery. Use a trodden path up to the hump rather then going in the high grass where you can't see the possible obstacles to avoid the possibility of any injury caused by slipping for example. Indoor move away any object that's in the way to make sure no one will fall over something and get hurt. Keep the dog on the leash so it doesn't run away or get in conflict with other dogs/people.

Final proposal for FMP

Proposal

Throughout this course I have shown an interest in pet photography and, as this is what I am interested in I would like it to be the subject of my final major project. Also, I have done documentary style photos, which I really enjoyed doing and was pleased with the outcomes so I think mixing these two things would be a good idea. I chose this subject, first because I'm just a huge dog fun and second because I think that the relationship that pets have with their owners is extremely interesting and worth to capture their moments.

I would like to do documentary style shoots but kind of posed shots of a client and her dog, which will make my project client led as well. I think to create genuine and down to earth images that show pets interacting naturally with their environment and owner is best to shoot the images at a place(s) where the client and the dog would be happy with and my subjects will feel comfortable and relaxed whether the images shot indoor or outdoor.

My influences for this final project will come from several photographers' work that I have looked at especially for this project, however I used Zach Rose as my main influence who has taken interesting, but also hilarious photographs involving pets and their owners.

To complete this unit I intend to use digital photography and Photoscape for post editing. I intend to shoot a series of images with my Canon ESO 1100D camera with a 18-55mm lens. I intend to use natural light, because in my experience natural light gives me the images that really capture their personality. I agreed the day of the shooting with the client and the time of the shooting will be on Friday the 27th of June around 6pm, so I will look at the weather forecast to be absolutely prepared for the day for the outdoor shooting. When we'll do the indoor shooting I will try to avoid using flash, because that usually washes out the colours and makes the images look less flattering as well. I intend to shoot the images on eye level and wide angle to involve the environment as well and make the subject pop out from the background. If needed I will get use of props to engage with the dog or just to simply add more interest to the image. My aim will be to capture their lasting moments and expressions in a creative way.

Like on these examples...


Review my research

I think that with my research I successfully covered all of the points and tasks that was set out in the brief and I am definitely more informed about the techniques and the kind of equipment and camera setting that will be beneficial for my project. I did reviewed some other photographers's work as well and considered the positives and negatives of the images. To come up with my own idea I reviewed my research about the project of Zach Rose as his work was very influential for me. 

Here is the mind map...


...and a mind map about my idea developing.


Photographer research Zach Rose

During my research there was an image that really caught my attention. The photo was hilarious and the idea has just blew my mind. Here is the image:


Soon I've found out there is a whole series of images like this...

'Peatheadz' by Zach Rose (Buffalo NY)

In his hilarious series 'Petheadz', he takes DSLR portraits of people's pets and mashes them up with portraits of their owners by cleverly holding the camera in the foreground.

"Holding a DLSR in one hand with a pet photo on the LCD viewfinder, he carefully places the camera over the owner’s body to simulate an animal’s head over the pet owner’s shoulders, and then snaps a picture. What you get is cleverly matched pet and owner hybrid image.He has relatively simple gear using an IPhone, and a DSLR with a 50mm lens."

 http://www.exposureguide.com/inspiration/hybrid-photo-series-petheadz-features-pets-and-their-owners/


As I considered about the technique, Zach uses  the method of forced perspective to fit pets and owners together in one photo. BUT he not just doing it with one camera, (as you can do forced perspective with only one camera) he is using two different digital camera, so that's kind of another technique that can be explored. Although the method looks kind of complicated, because it's an image in an image photo, actually it isn't as hard as it looks. You just have to find the right distance and height to match up the bodies and take a quick shot. Still his idea is very hilarious and so influential to me.


The variety of themes are so funny however something disturbs me a little bit...In my opinion, you have to be careful about the background as I don't think the one's that have closer patterns and different colours work well for the overall image. It's obvious that you have to zoom in, take a closer image of the dog then you do with the owner and that means you will end up getting closer image of the background as well that will not match with the second picture. So I think the examples under works better, with a plane, same coloured, bigger patterned background. 


Forced Perspective

Forced perspective is a photographic illusion generally used to make two or more objects seem to be a different size than their actual size. It's made by a single lens of the camera.

Types: - Making a main subject larger or smaller, merging subjects, bending gravity.

Taking a forced perspective photo is not difficult and doesn’t require any special skills. All you need to have is creativity, a camera, a willing accomplice, the perfect setting and timing, the patience to choreograph your trick and mostly, imagination. As you can see in the following examples, you can try forced-perspective photography while travelling, at your backyard or at home. In some cases, it’s just being in the right place in the right time. If you have more of such photographs, do share them with us please.


My example of using two digital lens based image maker...


My example of forced perspective...


Although these images aren't including dogs I was still able to use 2 cameras successfully to create an image and use one camera to create a forced perspective effect on another image.

Another creative pet photographer work can be seen on this website: 

Article headline: Photographer shoots heartwarming portraits of her pet dogs with comical expressions and costumes.

http://www.exposureguide.com/inspiration/photographer-shoots-heartwarming-portraits-of-his-pet-dogs-with-comical-expressions-and-costumes/